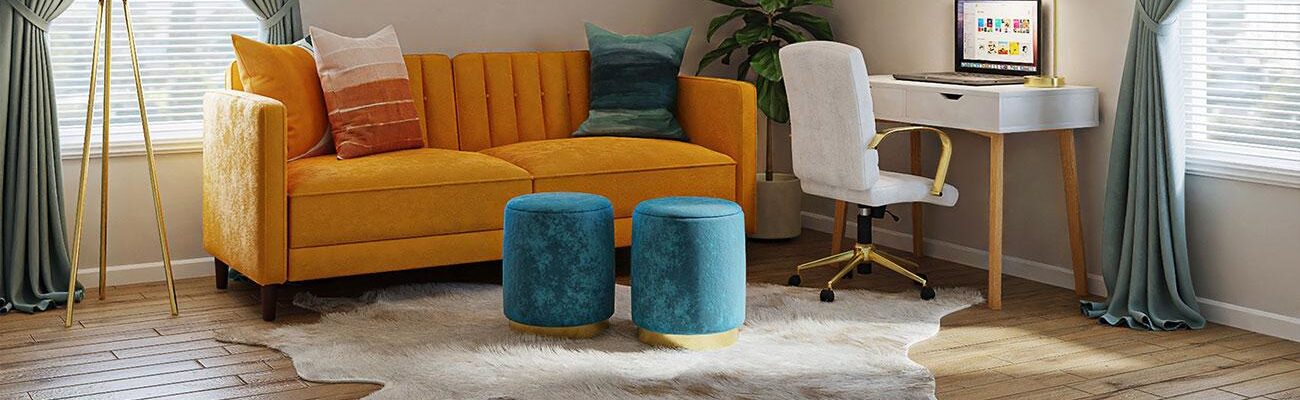
Latest post

Others

Maximizing Space With Floor to Ceiling Glass Features

You’re likely no stranger to the challenges of making the most of limited space in your home or office. One effective way to create a more open and airy feel is by incorporating floor-to-ceiling glass features. By seamlessly connecting indoors and outdoors, these features can flood your space with natural light and make it feel more expansive. But what specific design considerations and strategies can you use to maximize the benefits of glass features? Let’s take a closer look at how you can harness the potential of glass to transform your space.

Benefits of Glass Features

When it comes to floor-to-ceiling glass features, you’re not just looking at a stylish addition to your space – you’re also investing in a multitude of benefits that can elevate your lifestyle and property value.

For one, glass features allow for an abundance of natural light, which can significantly reduce your energy consumption and reliance on artificial lighting. This, in turn, can lead to lower utility bills and a more environmentally friendly living or working space.

Another benefit of glass features is the illusion of a larger space. By creating a seamless transition between indoors and outdoors, you can make your rooms feel more expansive and airy.

This can also increase your property’s appeal to potential buyers or renters, should you decide to sell or lease in the future. Furthermore, floor-to-ceiling glass features can also provide unobstructed views of your surroundings, creating a sense of connection to nature and the outdoors.

These benefits, among others, make glass features a worthwhile investment for anyone looking to enhance their space.

Design Considerations and Options

Now that you’ve considered the benefits of incorporating glass features into your space, it’s time to think about how to make them a stunning reality. When designing your floor-to-ceiling glass feature, you have several options to consider.

First, think about the style and aesthetic you want to achieve. Do you prefer a sleek, minimalist look or a more decorative style with intricate frames or patterns?

You also need to consider the type of glass you want to use. Low-iron glass, for example, is ideal for minimizing green tint and maximizing clarity.

Another key consideration is the frame material and color. You can choose from a range of materials, including aluminum, steel, and wood, and select a color that complements your interior design.

Additionally, you may want to consider adding features such as sliding glass doors, glass partitions, or glass shelves to enhance the functionality of your space.

Lastly, consider the hardware and accessories you’ll need to complete your design, such as handles and hinges.

Maximizing Natural Light

Incorporating floor-to-ceiling glass features is especially effective at maximizing natural light, as it allows sunlight to flood your space.

This is particularly beneficial in areas with limited natural illumination, as the glass features help to amplify and distribute the available light.

You can further enhance the natural light in your space by using low-iron glass for your floor-to-ceiling features.

This type of glass has a reduced iron content, resulting in a clearer and more transparent appearance that minimizes the green tint often associated with regular glass.

By using low-iron glass, you can ensure that the natural light entering your space is as clear and vibrant as possible.

To maximize natural light, consider the orientation and placement of your floor-to-ceiling glass features.

Place them on the south-facing side of your space to capture the most sunlight throughout the day.

Additionally, consider using clerestory windows or skylights to bring in natural light from above, further illuminating your space and reducing the need for artificial lighting.

Space Saving Glass Solutions

You don’t have to sacrifice style for functionality when it comes to floor-to-ceiling glass features in small or narrow spaces. When designed correctly, these features can create the illusion of a larger room and provide an abundance of natural light.

To maximize space, consider incorporating space-saving glass solutions into your design. Here are a few ideas:

Solution Description Benefits
Sliding Glass Doors Replace traditional doors with sliding glass doors to save space and add functionality. Creates a seamless transition between indoors and outdoors, while also saving floor space.
Glass Room Dividers Use glass room dividers to separate different areas of a room without obstructing natural light. Keeps the room feeling open and airy, while also providing a sense of separation.

| Foldable Glass Walls | Install foldable glass walls to create a flexible and functional space. | Allows you to easily open up the room to the outdoors or create a private space when needed.

Installation and Maintenance Tips

Installing floor-to-ceiling glass features requires careful planning and expertise to ensure a seamless and safe integration into your space. You’ll want to work with a professional to assess the structural integrity of your building and determine the best approach for installation.

This may involve reinforcing the floor or walls to support the weight of the glass.

When it comes to installation, you’ll want to ensure that the glass is properly sealed to prevent air leaks and moisture buildup. This can be achieved through the use of specialized sealants and weatherstripping.

Additionally, you should consider installing a drainage system to direct water away from the glass and prevent damage.

To maintain your floor-to-ceiling glass features, you’ll want to establish a regular cleaning schedule.

Use a mild soap and water solution to clean the glass, and avoid using abrasive materials that can scratch the surface.

You should also inspect the glass regularly for signs of damage or wear, and address any issues promptly to prevent them from becoming more serious problems.

Conclusion

You’ve successfully maximized your space with fornecedor de divisorias de vidro piso teto -to-ceiling glass features. By incorporating these sleek designs, you’ve created a seamless transition between indoors and outdoors. Remember to maintain your glass features to keep them looking their best. Regular cleaning and inspections will help prevent damage and ensure they continue to bring in natural light and make your space feel more open and airy for years to come.

Others

Step-by-Step Process for Buying USDT

You’re looking to buy USDT, a popular stablecoin pegged to the US dollar. To do so, you’ll need to navigate a series of steps, from setting up a digital wallet to completing the purchase. It’s essential to take your time and do your research to avoid any potential pitfalls. Choosing a reliable exchange is crucial, but what makes an exchange reliable, and how do you verify your account to ensure a smooth transaction? By understanding the process, you’ll be able to make in buy usdt lebanon med decisions and successfully buy USDT. Let’s break down the steps involved.

Setting Up a Digital Wallet

To start buying USDT, you’ll need a place to store it – a digital wallet. This is a software program that securely stores, sends, and receives cryptocurrencies.

There are several types of digital wallets, including mobile, desktop, and hardware wallets. Mobile wallets are convenient for everyday use, while desktop wallets offer more advanced features. Hardware wallets, on the other hand, provide the highest level of security.

When choosing a digital wallet, consider its compatibility with USDT. Not all wallets support this cryptocurrency, so make sure to select one that does.

You’ll also want to ensure the wallet is user-friendly and has robust security features, such as two-factor authentication. Some popular digital wallets that support USDT include MetaMask, Trust Wallet, and Ledger Live.

Once you’ve selected a wallet, download and install it on your device.

Follow the setup instructions to create a new wallet and set a secure password. Make sure to back up your wallet’s recovery phrase, as this will allow you to restore your wallet in case you lose access to it.

Choosing a Reliable Exchange

Choosing a Reliable Exchange

Now that you have a digital wallet set up to store USDT, it’s time to find a reliable exchange where you can buy it. With numerous exchanges available, selecting the right one can be overwhelming. To make an informed decision, consider several factors, including fees, security, and supported payment methods.

Here’s a comparison of popular exchanges:

Exchange Key Features
Binance Low fees, high liquidity, and a wide range of assets
Coinbase User-friendly interface, robust security, and fiat support
Kraken Advanced trading tools, low fees, and a large selection
Huobi Competitive fees, high liquidity, and a vast asset list
eToro Social trading platform, low minimum deposit, and regulation

When choosing an exchange, look for one that offers competitive fees, robust security measures, and a user-friendly interface. Additionally, consider the exchange’s reputation, customer support, and available payment methods to ensure a smooth buying experience.

Verifying Your Exchange Account

Verifying your exchange account is an essential step in securing your transactions and accessing advanced features. This process typically involves providing identification documents and completing a series of security checks.

To verify your account, you’ll usually need to click on the verification link sent to your email address after signing up. Then, navigate to the verification or KYC (Know Your Customer) section of your exchange account.

You will be prompted to provide identification documents, such as a passport, driver’s license, or national ID card. Make sure the documents are valid and not expired.

Some exchanges may also require proof of address, which can be a utility bill or bank statement. Follow the exchange’s instructions to upload the required documents.

The verification process may take a few hours or a few days, depending on the exchange’s processing time. Once your account is verified, you’ll have access to more features and higher transaction limits.

Funding Your Exchange Account

Now that your exchange account is verified, you’re ready to move on to the next step: adding funds to your account. Funding your account is a necessary step before buying USDT.

You can fund your account using various payment methods, including bank transfers, credit/debit cards, and e-wallets. The available payment methods may vary depending on your location and the exchange’s policies.

To fund your account, navigate to the “Deposit” or “Add Funds” section of your exchange account.

Select your preferred payment method from the list of available options. If you choose to use a bank transfer, you’ll need to provide your bank account details. For credit/debit card transactions, you’ll need to enter your card information.

E-wallet transactions may require you to log in to your e-wallet account.

Once you’ve selected your payment method, follow the on-screen instructions to complete the transaction.

The processing time and fees associated with each payment method may vary. Make sure to review the fees and processing times before completing the transaction.

After your funds are deposited, you’ll be ready to move on to the next step in the process.

Completing the USDT Purchase

You’ve successfully funded your exchange account, and it’s time to proceed with the USDT purchase.

Now, navigate to the exchange’s trading page, where you’ll find a list of available cryptocurrencies, including USDT.

Click on the USDT option, and you’ll be taken to a page that displays the current market price and other relevant information.

Choose the type of order you want to place – market or limit.

A market order allows you to buy USDT at the current market price, while a limit order lets you specify the price at which you’re willing to buy.

If you’re new to cryptocurrency trading, a market order is often the simplest option.

Enter the amount of USDT you want to buy, and review the order details carefully.

Make sure you understand any fees associated with the purchase.

Once you’re satisfied with the order, click the “Buy” button to complete the transaction.

The USDT will be added to your exchange account, and you’ll receive a confirmation of the purchase.

Conclusion

You’ve successfully navigated the step-by-step process for buying USDT. By setting up a compatible digital wallet, choosing a reliable exchange, verifying your account, funding it, and completing the purchase, you’ve taken control of your USDT acquisition. Now, you can store, send, or trade your USDT as needed. Keep your wallet secure and monitor market fluctuations to make the most of your USDT investment. Your USDT is now ready for use.

Others

Integrating Selenium Panel With Ci/Cd a Seamless Approach

When you integrate Selenium Panel with your CI/CD tools, you’re on the path to streamlining your test automation process. By doing so, you’ll be able to efficiently configure and execute tests across multiple browsers and environments. But it’s not just about the technical benefits – it’s also about reducing the time and effort required to set up and execute tests, ultimately leading to faster time-to-market for your applications. Now, you’re probably wondering which CI/CD tools to choose and how to set up the integration – that’s where the real benefits begin to unfold, and we’re just about to explore them.

Understanding Selenium Panel Basics

When building test automation frameworks, you’re likely to encounter various tools that can help streamline your workflow. Selenium Panel is one such tool that provides a user-friendly interface for managing and executing Selenium tests. It simplifies test automation by allowing you to configure and run tests with ease.

You’ll find that Selenium Panel supports multiple browsers and environments, making it an ideal choice for cross-browser testing.

Its intuitive dashboard allows you to view test results, track execution history, and manage test suites. This makes it easier for you to identify and fix issues quickly.

As you work with Selenium Panel, you’ll notice that it integrates well with various programming languages and frameworks.

This flexibility makes it easy to incorporate Selenium Panel into your existing test automation setup. By leveraging Selenium Panel’s features, you can reduce the time and effort required to set up and execute tests, allowing you to focus on more critical aspects of your project.

Choosing the Right CI/CD Tools

In setting up a CI/CD pipeline for your Selenium tests, you need to choose the right tools to streamline your workflow. Your primary focus should be on tools that support automation, version control, and continuous integration. Popular CI/CD tools include Jenkins, Travis CI, CircleCI, and GitHub Actions.

Each tool has its strengths and weaknesses, so consider factors like ease of use, scalability, and compatibility with your existing infrastructure.

When evaluating CI/CD tools, think about your specific needs. Do you need support for containerization, such as Docker? Are you already invested in a particular cloud ecosystem, like AWS or Google Cloud? Consider tools that integrate well with these technologies.

Additionally, look for tools with robust reporting and analytics capabilities, as these will help you monitor and optimize your pipeline.

Ultimately, the right CI/CD tool for you’ll depend on your project’s unique requirements and your team’s expertise. By carefully evaluating your options, you can choose a tool that helps you automate your Selenium tests and deliver high-quality software faster.

Setting Up the Integration

You’ve selected your CI/CD tool, now it’s time to set up the integration with your Selenium tests. This step is crucial in ensuring your tests are executed automatically as part of your continuous integration and delivery pipeline.

Start by installing the necessary plugins or extensions in your CI/CD tool that support Selenium integration. For instance, if you’re using Jenkins, you’ll need to install the Selenium plugin.

Next, configure your CI/CD tool to communicate with your Selenium test runner. This typically involves setting up environment variables, such as the Selenium server URL and browser type.

You may also need to specify the test suite and test cases you want to run. Additionally, you’ll need to configure the test results reporting, so you can view the test outcome and any errors that occurred.

Automating Test Suites Efficiently

Automating Test Suites Efficiently

================================

Automating test suites can significantly streamline your Selenium testing process. By automating your test suites, you can run your tests faster and more frequently, catching bugs earlier and reducing the overall testing time. This approach also allows you to focus on more complex testing tasks.

To automate your test suites efficiently, consider the following best practices:

Best Practice Description
Prioritize Test Cases Focus on the most critical test cases to ensure coverage of key functionality.
Use a Test Framework Utilize a test framework like TestNG or PyUnit to manage and execute your tests.
Leverage Parallel Execution Run multiple tests in parallel to reduce overall testing time.

Monitoring Test Results Effectively

Monitoring Test Results Effectively

Test results are crucial in identifying bugs and measuring the effectiveness of your Selenium test suites. You’ll want to ensure you’re monitoring these results effectively to make data-driven decisions and optimize your testing process.

Here are four key strategies to help you monitor test results effectively:

  1. Real-time Test Result Reporting: Set up real-time reporting to get immediate feedback on your test results. This will help you identify and address issues quickly, reducing downtime and improving overall efficiency.
  2. Customizable Dashboards: Create customizable dashboards to visualize your test results and track key metrics. This will give you a clear overview of your testing process and help you identify areas for improvement.
  3. Alerts and Notifications: Set up alerts and notifications to inform your team of test failures, errors, or other critical events. This will ensure that issues are addressed promptly and that your team is always on top of testing results.
  4. Trend Analysis: Use trend analysis to track changes in your test results over time. This will help you identify patterns and trends, enabling you to make in تابلو چلنیوم med decisions about your testing process.

Conclusion

By integrating Selenium Panel with CI/CD tools, you’ll streamline your test automation process and significantly reduce the time and effort required to set up and execute tests. This seamless approach enables you to efficiently manage test suites, track execution history, and monitor test results. As a result, you’ll be able to deliver high-quality applications faster, which means a faster time-to-market and a competitive edge in today’s fast-paced tech landscape.

Others

A Guide to Designing Your Dream Dome House

As you consider designing your dream dome house, you’re likely envisioning a unique and eco-friendly space that suits your lifestyle. But before you can bring this vision to life, it’s essential to assess your needs and priorities. What’s your ideal square footage, and how many occupants will be living in the dome? What kind of climate and location will the dome be situated in? Answering these questions will help you make in dome home med decisions about the dome’s shape, materials, and design. But where do you start, and what are the key factors to consider?

Assessing Your Dome House Needs

When building a dome house, you’ll first need to assess your needs. This involves considering the number of people who’ll be living in the house, as well as your lifestyle and habits.

Think about the activities you’ll be doing inside the house and the type of spaces you’ll need to accommodate them. For example, do you work from home and need a dedicated office space? Do you have hobbies that require a workshop or studio?

You’ll also need to think about the climate and environment where your dome house will be located. If you live in an area prone to natural disasters, you may need to design your dome house with extra reinforcement or safety features.

Additionally, consider the local building codes and regulations that you’ll need to comply with.

Make a list of the essential spaces and features you need, such as bedrooms, bathrooms, kitchen, and living areas.

Don’t forget to include storage space, electrical outlets, and other necessities. This assessment will help you create a functional and comfortable dome house that meets your needs.

Choosing the Right Dome Shape

Now that you have a clear idea of your needs, it’s time to think about the shape of your dome house. A dome’s shape determines its structural integrity, interior space, and exterior appeal. You’ll want to choose a shape that suits your lifestyle and preferences.

Dome Shape Characteristics Advantages
Full Dome A complete sphere, with no flat surfaces Provides maximum interior space and structural strength
Hemispherical Half of a sphere, often used for earth-sheltered homes Offers a natural, earthy look and good energy efficiency
Elliptical An oval-shaped dome, often used for smaller homes Provides a unique look and can be more affordable to build
Geodesic A dome composed of many triangular faces Offers excellent structural strength and can be built with a variety of materials

When choosing a dome shape, consider factors such as the size of your property, your budget, and your desired level of energy efficiency. Think about the activities you’ll be doing inside your dome house and how you’ll use the space. By considering these factors, you can choose a dome shape that meets your needs and provides a comfortable, functional living space.

Designing for Climate and Location

Designing for climate and location is crucial to creating a comfortable and energy-efficient dome home. When you consider your climate, think about the temperature, humidity, and weather patterns in your area.

If you live in a hot climate, you’ll want to design your dome house to stay cool. This can be achieved by using shading devices, such as overhangs or louvers, to block direct sunlight. In colder climates, you’ll want to focus on retaining heat. This can be done by using insulation, thermal mass, and passive solar design.

Your location will also play a significant role in your design. If you’re building on a slope, you’ll need to consider the site’s topography and how it will affect your dome’s foundation and drainage.

If you’re in an area prone to natural disasters, such as earthquakes or hurricanes, you’ll need to design your dome to be resilient and able to withstand these forces. By taking your climate and location into account, you can create a dome house that’s tailored to your specific needs and environment. This won’t only make your home more comfortable but also more sustainable.

Selecting Sustainable Building Materials

Selecting the right materials for your dome house is a critical step in creating a sustainable and eco-friendly home. You’ll want to consider materials that are not only environmentally friendly but also durable and low maintenance. This will help reduce your carbon footprint and save you money in the long run.

When it comes to selecting sustainable building materials, there are many options to choose from. Here are some popular choices:

Material Benefits Considerations
Recycled Steel Durable, low maintenance Higher upfront cost
Bamboo Renewable, lightweight May require treatment
Low-Carbon Concrete Reduces greenhouse gases May be more expensive

You should also consider the source of your materials and choose locally sourced options whenever possible. This will help reduce transportation emissions and support your local economy. Additionally, look for materials that are certified by organizations such as the Forest Stewardship Council (FSC) or the International Organization for Standardization (ISO). By choosing the right materials, you can create a sustainable and eco-friendly dome house that you can feel good about.

Building and Budgeting Strategies

Building a dome house on a budget requires strategic planning from the ground up. You’ll need to prioritize your spending and make conscious decisions about where to allocate your resources.

Start by determining your overall budget and breaking it down into smaller categories, such as land acquisition, materials, labor, and permits.

Next, consider the building methods and materials that will help you stay within budget. For example, you might choose to use locally sourced materials or opt for a prefabricated dome kit.

You’ll also want to think about the size and complexity of your design, as these factors can greatly impact your construction costs.

As you begin building, be prepared to make adjustments as needed.

Keep track of your expenses and stay flexible, making changes to your plan if you find that you’re going over budget.

By being proactive and strategic in your building and budgeting, you can create a beautiful and functional dome house that meets your needs and stays within your budget.

A well-planned budget will help you avoid costly surprises and ensure a successful project.

Conclusion

You’ve made it through the guide to designing your dream dome house. Now it’s time to turn your vision into reality. By assessing your needs, choosing the right dome shape, and selecting sustainable materials, you’ll create a unique and eco-friendly home. Stay on track with your budget and building strategies to avoid costly surprises. With careful planning, you’ll be living in your dream dome house, enjoying a space that’s tailored to your lifestyle and climate.

Others

Masteron for Sale in the USA: Human Growth Hormone for Sale at Gainabolic

For athletes and bodybuilders looking to enhance their performance and achieve a lean, sculpted physique, Masteron and Human Growth Hormone (HGH) are two powerful options. Gainabolic offers premium Masteron for sale in the USA as well as high-quality Human Growth Hormone for sale, making it the top destination for fitness enthusiasts serious about reaching their goals. In this post, we’ll explore the benefits of Masteron and HGH, and why Gainabolic is the best source for these products in the USA.

Why Choose Masteron?

Masteron (Drostanolone) is a popular anabolic steroid that is highly favored by bodybuilders during cutting cycles. Known for its ability to enhance muscle definition and give users a harder, more chiseled appearance, Masteron is often used when athletes want to shed fat while maintaining lean muscle.

Key benefits of Masteron include:

  • Muscle Definition: Masteron helps improve muscle hardness and vascularity, giving users a defined, toned look.
  • Fat Loss: Masteron is effective in promoting fat loss without causing excessive water retention.
  • Mild Side Effects: Compared to other steroids, Masteron is considered relatively mild, with fewer side effects.
  • Performance Enhancement: Masteron boosts strength and endurance, allowing athletes to push through intense workouts while maintaining a lean physique.

If you’re looking to achieve a lean, muscular body, Gainabolic offers Masteron for sale in the USA, providing athletes and bodybuilders with access to this powerful steroid.

Why Choose Human Growth Hormone (HGH)?

Human Growth Hormone (HGH) is a naturally occurring hormone that plays a crucial role in muscle growth, fat metabolism, and overall body composition. Bodybuilders and athletes often use HGH to boost muscle growth, improve recovery times, and enhance overall performance.

Key benefits of HGH include:

  • Increased Muscle Mass: HGH promotes the development of lean muscle tissue, making it ideal for bodybuilders during bulking or cutting phases.
  • Fat Loss: HGH helps accelerate fat metabolism, allowing users to shed excess body fat while maintaining muscle mass.
  • Enhanced Recovery: HGH improves recovery times after intense workouts, helping athletes train more frequently and with greater intensity.
  • Improved Skin and Bone Health: HGH has anti-aging benefits, improving skin elasticity and bone density.

Gainabolic offers high-quality Human Growth Hormone for sale, providing athletes with the tools they need to reach their full potential in the gym.

Why Buy from Gainabolic?

When it comes to finding Masteron for sale in USA or purchasing Human Growth Hormone, Gainabolic stands out as the go-to source for high-quality, authentic products. Here’s why Gainabolic is the best choice:

  • Premium Products: Gainabolic provides only the highest quality Masteron and HGH products, ensuring safety, purity, and effectiveness.
  • Competitive Pricing: Gainabolic offers affordable prices on all their steroids and supplements, making it easier for athletes to reach their goals without breaking the bank.
  • Fast & Discreet Shipping: Gainabolic ensures fast, secure, and discreet shipping across the USA, so your products arrive safely and privately.
  • Excellent Customer Service: The team at Gainabolic is always ready to assist with any questions or concerns, helping you choose the right products for your fitness journey.

How to Use Masteron and HGH Safely

It’s important to use both Masteron and HGH responsibly to maximize their benefits and minimize the risk of side effects. Masteron is typically used in cutting cycles, with dosages tailored to your specific goals and experience level. HGH is often used in longer cycles to promote steady muscle growth and fat loss. Always consult with a healthcare professional or a knowledgeable fitness expert before starting any steroid or hormone cycle, and consider incorporating post-cycle therapy (PCT) after completing a steroid cycle.

Conclusion

Whether you’re looking for Masteron for sale in the USA or seeking Human Growth Hormone for sale, Gainabolic is the trusted provider for high-quality steroids and performance-enhancing products. With a wide range of premium products, competitive pricing, and discreet shipping, Gainabolic is your go-to source for achieving your fitness goals. Visit Gainabolic today to explore their full selection of Masteron, HGH, and other powerful supplements to help you build the physique you’ve always dreamed of